

For miniature enthusiasts, crafting a dollhouse is more than just a hobby—it’s a form of storytelling. Every room, every piece of furniture, and every detail helps bring the tiny world to life. However, one element often overlooked by beginners is lighting. Proper lighting can dramatically enhance the realism, mood, and visual appeal of your miniature masterpiece. Among the various lighting options available, LED art lights stand out for their versatility, energy efficiency, and ease of use.
In this beginner’s guide, we’ll explore how to light your dollhouse using LED art lights. We’ll discuss why LED lights are ideal, different types of lighting effects you can achieve, how to install them, and safety tips to help you get started.
Why Choose LED Art Lights For Your Dollhouse?
LED art light have quickly become the go-to choice for miniature hobbyists, and for good reason:
- Energy Efficient: LEDs consume far less power than traditional bulbs, which is perfect for long-term display.
- Low Heat Output: Unlike incandescent lights, LEDs emit very little heat, making them safe for delicate dollhouse materials like plastic, wood, and paper.
- Compact Size: LED art lights come in various tiny sizes that fit perfectly into dollhouses without ruining the scale or aesthetic.
- Longevity: They last much longer than conventional bulbs, meaning fewer replacements and less maintenance.
- Customizable Effects: From warm ambiances to vibrant color accents, LED art lights can mimic real-life lighting scenarios effectively.
Types Of LED Art Lights For Dollhouses
Before diving into installation, it’s important to know the different types of LED lights suitable for miniature lighting.
1. LED Strip Lights
These are flexible strips embedded with small LEDs. They can be cut to custom lengths and are ideal for general room lighting or under-cabinet lighting in kitchens and bathrooms.
2. LED Spotlights and Mini Bulbs
These mimic ceiling lights or wall sconces. They can be used to highlight specific areas like artwork, fireplaces, or furniture.
3. Fiber Optic LEDs
These are perfect for star ceilings or creating tiny glowing accents, such as glowing embers in a fireplace or fireflies in a garden scene.
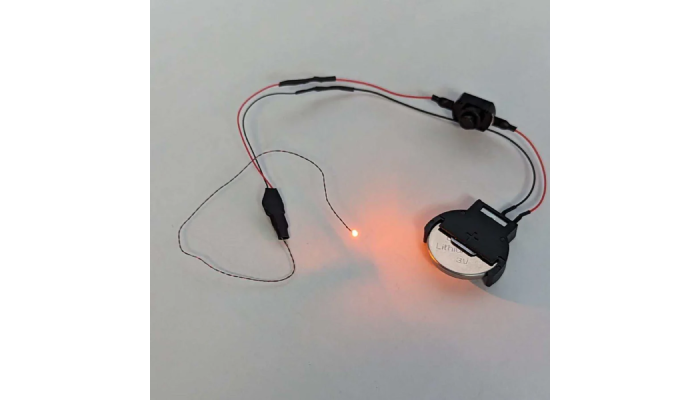
4. Battery-Operated LEDs
These are excellent for beginners who prefer to avoid complex wiring. Many battery-operated options include adhesive backs and switches for easy use.
Planning Your Dollhouse Lighting
Before installing any LED art light, create a lighting plan:
- Room-by-Room Analysis: Determine which rooms need lighting. Bedrooms might require soft ambient light, while kitchens could benefit from brighter, task-oriented lighting.
- Choose Lighting Effects: Decide if you want a warm, cozy effect or a modern, bright look. LEDs come in various color temperatures (measured in Kelvins), from warm white (2700K) to daylight (6000K).
- Determine Power Source: Decide between battery-powered, USB, or a wired system. Battery options are more flexible, but wired systems are more reliable for permanent setups.
- Sketch a Circuit Plan: For complex projects, sketch where each LED will go and how the wires will run. This helps in hiding wires behind walls or under floors for a cleaner look.
How To Install LED Art Lights In Your Dollhouse?
Once your plan is in place, it’s time to install your lights. Here’s a step-by-step guide:
Tools and Materials You May Need:
- LED art lights (strip, bulbs, or spotlights)
- Soldering iron and solder (optional)
- Electrical tape or heat shrink tubing
- Wire cutters and strippers
- Double-sided tape or glue
- Power supply (battery box, USB adapter, or transformer)
Step 1: Test Your LEDs
Before installing anything, test each LED art light to make sure it works. This prevents having to uninstall faulty lights later.
Step 2: Mark Your Lighting Spots
Use a pencil to mark where each LED will go. Be sure the placement matches your original plan for lighting coverage and wire concealment.
Step 3: Install the Lights
Use glue, tape, or screws to mount the lights in their respective places. LED strips are usually self-adhesive. For mini bulbs, you may need to drill small holes or use custom fixtures.
Step 4: Connect Wires
Run the wires from each LED to the power source. Use wire strippers to expose the ends, and connect them using electrical tape, solder, or connectors. Make sure to maintain polarity—LEDs only work if the positive and negative ends are connected correctly.
Step 5: Power Up and Test
Turn on the power and test the entire system. Check for any flickering or dimming, which could indicate a loose connection or power issue.
Creative Lighting Ideas Using LED Art Lights
Now that your basic setup is done, consider these creative ways to use LED art lights in your dollhouse:
- Accent Lighting: Use LED spotlights to highlight a miniature painting, chandelier, or fireplace.
- Color Changing LEDs: Create a magical effect in a child’s room or fairy garden by using RGB LED lights with a remote.
- Outdoor Lighting: Simulate porch lights, garden lanterns, or pathway lighting with waterproof micro-LEDs.
- Mood Lighting: Install dimmable LEDs to change the ambiance according to the time of day or scene setting.
- Themed Rooms: For example, a 1970s room might use warm yellow lighting, while a futuristic scene could use cool white or blue LEDs.
Safety Tips For Working With LED Art Lights
Although LED art lights are low-voltage and relatively safe, it’s still important to follow basic safety precautions:
- Don’t Overload Circuits: Avoid connecting too many lights to a single power source. Check the voltage and current ratings of your LEDs and power supply.
- Use Insulation: Always insulate exposed wires with tape or heat shrink tubing to prevent short circuits.
- Secure Wires: Tape or glue wires along walls and floors to keep them out of sight and prevent accidental tugging.
- Avoid Flammable Materials: Even though LEDs run cool, avoid placing them directly on paper or fabric.
Conclusion
Lighting transforms a dollhouse from a simple miniature model into a captivating world with depth, realism, and emotion. Thanks to the innovation of LED art lights, it’s easier than ever for beginners to illuminate their tiny creations safely and beautifully. Whether you’re building a cozy cottage, a modern loft, or a whimsical fairy tale castle, the right lighting will elevate your work and enchant anyone who sees it.

Victor Hearns is an American multi-genre writer. He is best known as the author of two series of some popular books. Victor was born in Jacksonville, FL but grew up in California with her grandmother. Her education includes degrees in English and Biology from Stanford University. In her free time, he helps people around the globe to live healthier & joyful life.